
 Batch Imports
 Batch Imports
ADMINISTRATION -> Batch Imports
 Check our video tutorial on importing records for an example of how this works.
Batch Imports are used to import batch of records into College Office, so that you can import into College Office records which are exported to a CSV or a Spreadsheet document by a 3rd party application. The format of records you can import into College Office depends on the Import Template you select when creating a Batch Import. We can design Import Templates customized to the 3rd party application from which you wish to import records into College Office, contact us for more details.
This screen lets you review former batch imports and create new ones.
The columns of the table are:
- Created: date the Batch Import record was created
- Document: name of the document imported
- Uploaded: date & time the document was uploaded.
- Template: name of the Import Template used to process the document.
- Processed: date & time when the document was last processed for import.
- Status: status of the import process. Possible values are Pending if document was parsed but not processed, Verified if document was verified but not yet imported, Imported if document was successfully imported, Imported With Errors if document was imported but errors occurred and Invalid Parameter if document could not be processed because of an invalid parameter.
- Records: number of records that were imported.
To import a new document into College Office:
- Click the
 button on the lower right.
 - Select the Template and the document to import. The document contains the records to import (in a text file with comma separated values) and the Template informs College Office how to read and interpret the document. Make sure you have already created an Import Template that matches the format of the document you want to import! (check the Import Templates topic).)
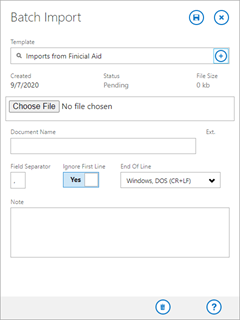
The Separator, End Of Line and Ignore First Line fields are inherited by default from the selected Import Template but can be overriden if necessary:
- Field Separator: character used to separate fields (or columns) in each line of the imported document. This is usually a comma ',' (hence the common name CSV which stands for comma separated values.) The fields you import should not contain the character used as a field separator. Suppose you use ',' and you import a course name which contains a comma then the system will interpret that comma as the end of the course name and will assume the rest of the course name is another field! In that case you should use another character as a field separator which you are certain will never be used in the content of any data you import!
- Ignore First Line: select Yes if the first line of the imported documents should be ignored (because it contains the names/headers of the columns/fields rather than proper values)
- End Of Line: character(s) used to indicate an end of line (EOL) in the imported document. The EOL delimiter is determined by the operating system the file comes from.
- Click the Save button on the upper right corner: this will cause College Office to read and parse the document (without importing any record yet) and to open a 3 pages screen that will display the results. Go to the Parameters page to record parameter values required by the Import Template. (click on the parameter to record its value).
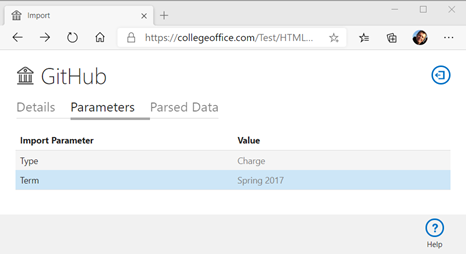
The list of parameters depends on the Import Type upon which the Import Template is based. Though these parameters may come pre-filled by a default value that was set in the Import Template, they may need to be set to a different value. Click on a row to set the value of that parameter or to read a description of the parameter. - Go to the Parsed Data page to review and verify the data that was parsed.
- This page lists all the lines that were parsed. Click on a line to view (and if applicable edit) the parsed value. You can filter the lines according to their status, to whether or not they have a warning (a ! after the line number) and to their position.
- Line: line number. If the line is followed by !, it means one of the columns of that line contains invalid data which will be ignored by the import.
- Status: import status of the line
- Imported: date and time when the line was imported into College Office if applicable. This date & time will match the date and time of the corresponding record(s) that was/were created in College Office
- Note: message that explains why the line could not be imported if applicable.
- Click on any row to view the columns of that line and how they will be interpreted.
- Click the Verify button on the lower right: College Office will verify the data without importing any record.
- You can correct the data and re-run Verifiy as often as needed. You can filter the lines by Status or by Warning to help you in the process.
- Click the Import button: College Office will import the lines that had successfully passed the verification process. Lines which have been imported have the blue Imported status. You may re-run Import as often as needed, the lines already imported will not be imported again.

Comment or report problem with topic